Add disks to ASM file systems
In this post explain how to manually add disks to the Linux operating system. We will also explain how to set them up so that they can be used to store data from our Oracle database.
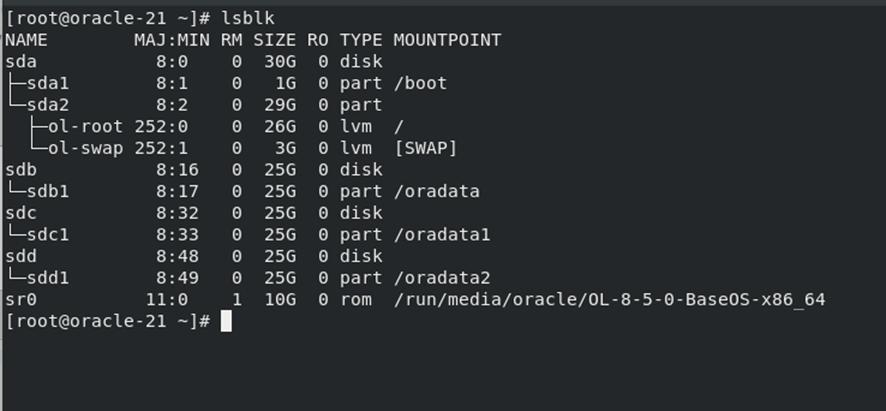
First, let's list the disks we have in our virtual machine.
There are two ways, one manually and the other through a graphical form as shown below.
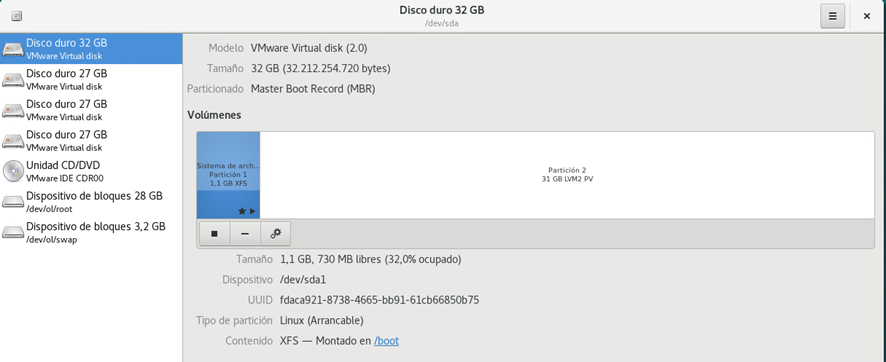
In this document we are not going to perform the actions graphically, as they are quite intuitive. You can rely on the documentation to perform the actions graphically. There are other graphical and widely used alternatives such as gparted, which we will present in later posts. In this case, therefore we will proceed to perform the process manually.
Steps to partition a Linux disk Linux
Step 1- Partition the disk
We list the disks that we have available with lsblk. In this case we have three 25G disks to partition (sdb,sdc,sdd).
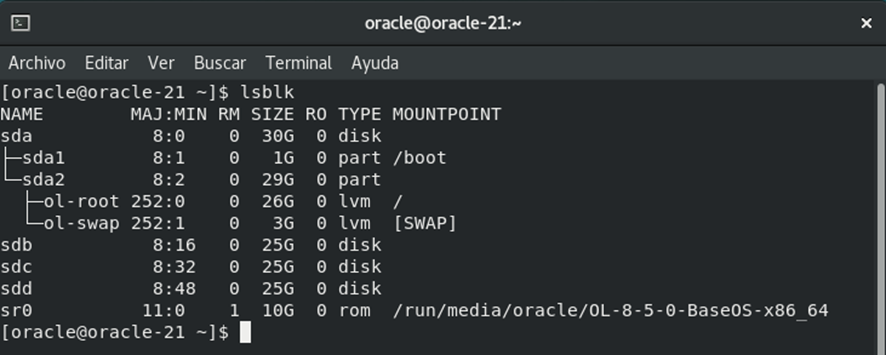
You can do the same with fdisk -l

Let's proceed to partition the devices. To do this we use the fdisk command (as root) and the device to partition.
fdisk /dev/sdb
[root@oracle-21 ~]# fdisk /dev/sdb
Welcome to fdisk (util-linux 2.32.1).
Changes will remain in memory only, until you decide to write them.
Be careful before using the write command.
Device does not contain a recognized partition table.
Created a new DOS disklabel with disk identifier 0xf8f72c85.
Command (m for help): n
Partition type
p primary (0 primary, 0 extended, 4 free)
e extended (container for logical partitions)T
Select (default p): p
Partition number (1-4, default 1): 1
First sector (2048-52428799, default 2048):
Last sector, +sectors or +size{K,M,G,T,P} (2048-52428799, default 52428799):
<enter>
Created a new partition 1 of type ‘Linux’ and of size 25 GiB.
Command (m for help): t
Selected partition 1
Hex code (type L to list all codes): L
0 Empty 24 NEC DOS 81 Minix / old Lin bf Solaris
1 FAT12 27 Hidden NTFS Win 82 Linux swap / So c1 DRDOS/sec (FAT-
2 XENIX root 39 Plan 9 83 Linux c4 DRDOS/sec (FAT-
3 XENIX usr 3c PartitionMagic 84 OS/2 hidden or c6 DRDOS/sec (FAT-
4 FAT16 <32M 40 Venix 80286 85 Linux extended c7 Syrinx
5 Extended 41 PPC PReP Boot 86 NTFS volume set da Non-FS data
6 FAT16 42 SFS 87 NTFS volume set db CP/M / CTOS / .
7 HPFS/NTFS/exFAT 4d QNX4.x 88 Linux plaintext de Dell Utility
8 AIX 4e QNX4.x 2nd part 8e Linux LVM df BootIt
9 AIX bootable 4f QNX4.x 3rd part 93 Amoeba e1 DOS access
a OS/2 Boot Manag 50 OnTrack DM 94 Amoeba BBT e3 DOS R/O
b W95 FAT32 51 OnTrack DM6 Aux 9f BSD/OS e4 SpeedStor
c W95 FAT32 (LBA) 52 CP/M a0 IBM Thinkpad hi ea Rufus alignment
e W95 FAT16 (LBA) 53 OnTrack DM6 Aux a5 FreeBSD eb BeOS fs
f W95 Ext’d (LBA) 54 OnTrackDM6 a6 OpenBSD ee GPT
10 OPUS 55 EZ-Drive a7 NeXTSTEP ef EFI (FAT-12/16/
11 Hidden FAT12 56 Golden Bow a8 Darwin UFS f0 Linux/PA-RISC b
12 Compaq diagnost 5c Priam Edisk a9 NetBSD f1 SpeedStor
14 Hidden FAT16 <3 61 SpeedStor ab Darwin boot f4 SpeedStor
16 Hidden FAT16 63 GNU HURD or Sys af HFS / HFS+ f2 DOS secondary
17 Hidden HPFS/NTF 64 Novell Netware b7 BSDI fs fb VMware VMFS
18 AST SmartSleep 65 Novell Netware b8 BSDI swap fc VMware VMKCORE
1b Hidden W95 FAT3 70 DiskSecure Mult bb Boot Wizard hid fd Linux raid auto
1c Hidden W95 FAT3 75 PC/IX bc Acronis FAT32 L fe LANstep
1e Hidden W95 FAT1 80 Old Minix be Solaris boot ff BBT
Hex code (type L to list all codes): 83
The partition table has been altered.
Calling ioctl() to re-read partition table.
Syncing disks.
The sequence is as follows:
n,p,1,<INTRO>,<INTRO>,w
If we want to see the options we are going to use before partitioning:
n,p,1,<INTRO>, <INTRO>,t,83,w
This tells the SSO that it is a new partition (n), that it is a primary partition (p), the partition number (1), and then we press Enter, telling the SSOO we want the entire disk to be in a single partition. Then we press the (t) key to indicate the partition type, (83) to indicate that it is a Linux partition Linux then (w). When we press w, the SSOO actually SSOO to make changes to the disk.
Por lo tanto la secuencia sería: n,p,1,<INTRO>,<INTRO>,w
As for the types of partitions available, you can view all the available options before choosing the partition type, in this case Linux, by pressing the L key, as shown in the previous screen output.
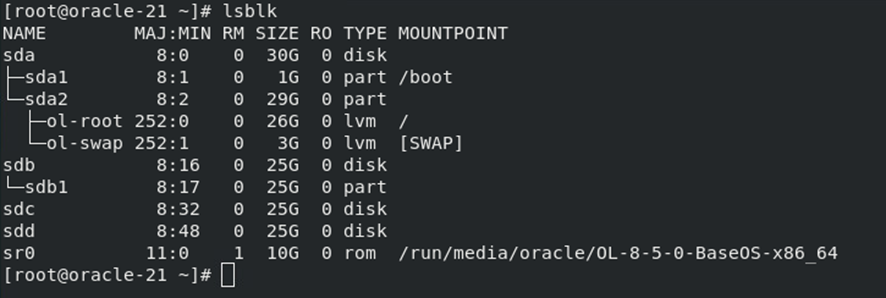
With any of the options indicated above, we can see how the devices are located, and we can see the recently created partition.
Step 2-Create filesystem
Now we need to create the file system. To do this, we’ll use the `mkfs` command. The `mkfs` command has multiple options; this blog aim to cover this command in detail—we’re focusing specifically on creating the storage needed to store our databases.
We’re going to format the partition we created earlier, which in our case is primary partition 1 (sdb1). Remember that the device /dev/sdb refers to the hard drive itself.
So now we’re going to format the partition as a Linux partition. This type of partition can be formatted as ext2, ext3, or ext4. By default, if no file system is specified, the partition is created as ext2. Using ext2 is no longer recommended; most Linux systems use ext4. Therefore, in this case, we’ll format it as ext4, which is the file system currently in use.
You can use either of these two options (as root).
#> mkfs -t ext4 /dev/sdb1
#> mkfs.ext4 /dev/sdb1
(You can add -V for "verbose" to see more information while the command is running)
[root@oracle-21 ~]# mkfs.ext4 /dev/sdb1
mke2fs 1.45.6 (20-Mar-2020)
Discarding device blocks: 4096/6553344
done
Creating filesystem with 6553344 4k blocks and 1638400 inodes
Filesystem UUID: acb407b4-8572-447d-aeed-fb0f2c630daf
Superblock backups stored on blocks:
32768, 98304, 163840, 229376, 294912, 819200, 884736, 1605632, 2654208,
4096000
Allocating group tables: done
Writing inode tables: done
Creating journal (32768 blocks): done
Writing superblocks and filesystem accounting information: done
We verify that the command has been executed correctly:
[root@oracle-21 ~]# file -sL /dev/sdb1
/dev/sdb1: Linux rev 1.0 ext4 filesystem data, UUID=acb407b4-8572-447d-aeed-fb0f2c630daf (extents) (64bit) (large files) (huge files)
[root@oracle-21 ~]#
Step 3- Create the mounting point
Una vez hemos realizado los pasos anteriores, simplemente tenemos que crear el directorio en el sistema operativo con el nombre que queremos darle a la partición creada anteriormente, que será el nombre al que nos referiremos posteriormente a nivel de almacenamiento.
Para ello simplemente creamos el directorio con mkdir <nombre directorio>.
En este caso como va a ser el espacio que almacenará datos para nuestra BBDD, lo llamaremos p.eje. oradata.
[root@oracle-21 ~]# mkdir /oradata
Step 4- Create the mount point, mount the partition
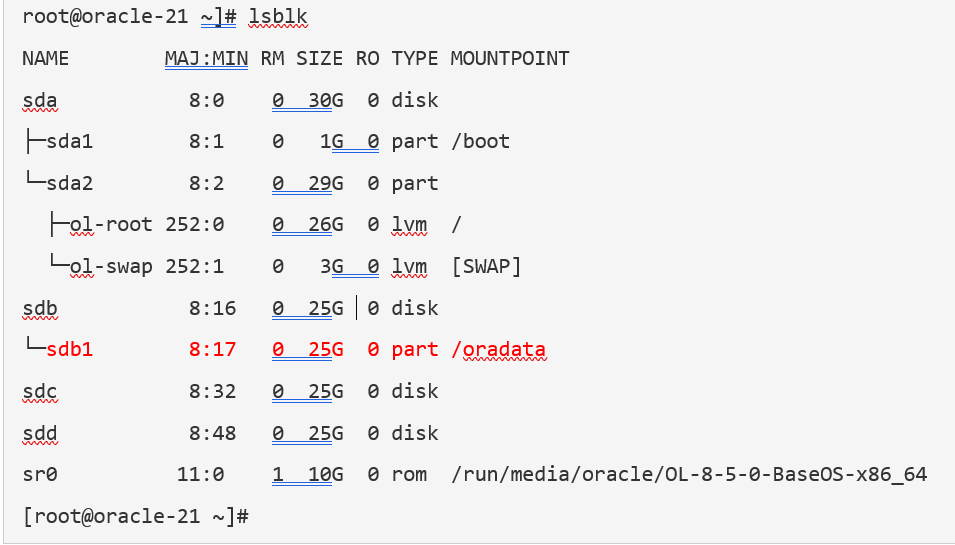
At this point, what we need to do is mount the partition. To do this, we simply have to tell the SSOO which partition we want to mount and how we want it to be represented at the SSOO level, at the directory level. In our case, the /dev/sdb1 partition is mounted as /oradata.
root@oracle-21 ~]# df -h
Filesystem Size Used Avail Use% Mounted on
devtmpfs 3.9G 0 3.9G 0% /dev
tmpfs 3.9G 0 3.9G 0% /dev/shm
tmpfs 3.9G 9.4M 3.9G 1% /run
tmpfs 3.9G 0 3.9G 0% /sys/fs/cgroup
/dev/mapper/ol-root 26G 5.4G 21G 21% /
/dev/sda1 1014M 318M 697M 32% /boot
tmpfs 796M 28K 796M 1% /run/user/1000
/dev/sr0 10G 10G 0 100% /run/media/oracle/OL-8-5-0-BaseOS-x86_64
[root@oracle-21 ~]#mount /dev/sdb1 /oradata
[root@oracle-21 ~]# df -h
Filesystem Size Used Avail Use% Mounted on
devtmpfs 3.9G 0 3.9G 0% /dev
tmpfs 3.9G 0 3.9G 0% /dev/shm
tmpfs 3.9G 0 3.9G 0% /sys/fs/cgroup
/dev/mapper/ol-root 26G 5.4G 21G 21% /
/dev/sda1 1014M 318M 697M 32% /boot
tmpfs 796M 28K 796M 1% /run/user/1000
/dev/sr0 10G 10G 0 100% /run/media/oracle/OL-8-5-0-BaseOS-x86_64
/dev/sdb1 25G 45M 24G 1%/oradata
[root@oracle-21 ~]#
The configuration of this partition will disappear on the next reboot, requiring you to manually remount each and every mount point that you need to access at the SSOO level. During this time, you will obviously be unable to access the data stored in that directory. To prevent this from happening, you need to configure the fstab file, located in the /etc path. The /etc/fstab file contains the configuration that tells the system how to mount the computer's drives. It is a file with six columns to configure.
As we have indicated before with the mkfs command, the parameters of the mount point vary according to needs, in our case, these parameters are enough.
/dev/sdb1 /oradata ext4 defaults 0 0
As a last step, the only thing left to do is to assemble it.
mount /oradata
Let's repeat the following steps with the devices (sdc, sdd) in order to have /oradata /oradata1 /oradata2
The final picture would be something like the following:
With this storage configuration in place, you can now proceed with creating the database; the data must be distributed across the newly created directories. With the advent of ASM, this configuration has become practically obsolete for larger installations. For Oracle Automatic Storage Manager (ASM) to identify the disks, they must be consistently identified with specific properties and permissions. This can be done (on Linux) using ASMLib or Udev; in this example, we will add the disks using the Linux device manager, UDEV. In a future post, we will describe how to configure the necessary settings so that the disks are managed via UDEV or ASMLib.