Install 19c step by step on Linux
Este artículo describe los pasos para instalar Oracle Database 19c de 64 bits en Oracle Linux en Redhat 9 de 64 bits.
Partimos de que la versión de SSOO Redhat 9 ya ha sido instalada, puedes seguir este enlace donde se explica cómo hacerlo.
https://bdconraul.com/instalacion-red-hat/
1 . Descargar el software
Depending on the support available, you can download the Oracle Database 19c software 19c OTN, edelivery, or MOS.
E-Delivery:
https://edelivery.oracle.com/osdc/faces/Home.jspx
OTN:
https://www.oracle.com/es/database/technologies/oracle19c-linux-downloads.html
MOS
https://support.oracle.com/signin
In our case, we opted for the OTN option.
We download the file that matches our architecture, in our case Linux bits:
p37260974_190000_Linux-x86-64.zip
Cómo veremos después, si intentas instalar directamente Oracle 19.3 en versiones Linux 9, podrás caer en un bug, para ello es necesario aplicar un parche durante la instalación.
Por ello necesitamos también decargar, la última versión del Opath, que puedes descargar del siguuiente enlace.
1) Bajamos el OPatch de la siguiente dirección de Oracle.
https://updates.oracle.com/download/6880880.html
2) BUG FIX:
There is a crucial and unique patch to resolve errors that occur during the installation of Oracle 19c Enterprise Manager (OEM) on Linux 9 (OL9) or RHEL9. Therefore, it will be necessary to apply the following patch (Patch 35775632):
Patch 35775632: PLACEHOLDER FOR STUBS.TAR PATCH FOR OL9 THAT FIXES BUG 33794281
You can download the patch at the following address:
https://support.oracle.com/
p35775632_190000_Linux-x86-64.zip
2. Preparing the environment.
You can change the host name using operating system commands with hostnamectl (recommended), or you can manually edit the "/etc/hosts" and "/etc/hostname".
To change the hostname, run the following (as root).
hostnamectl set-hostname new-host
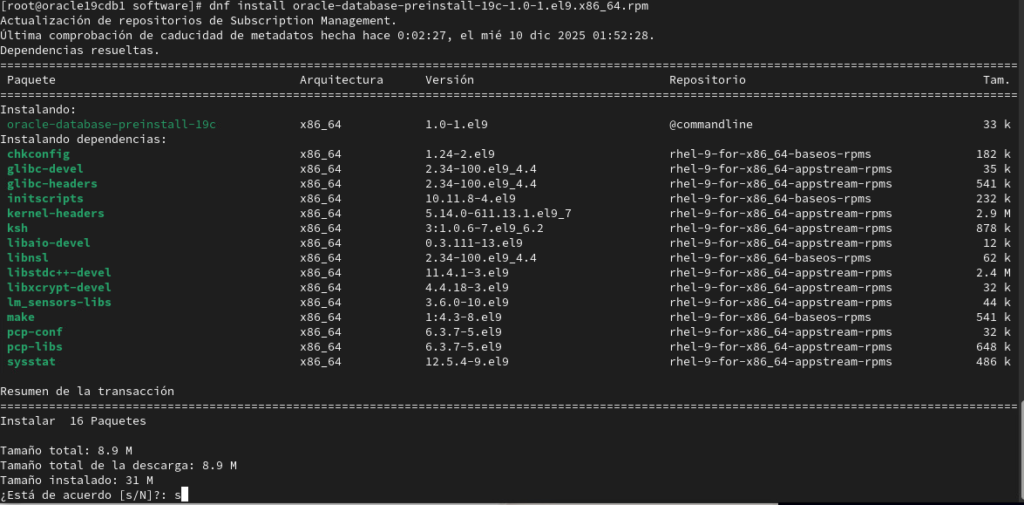
3. Instalamos los prerequisitos de software.
Para instalar los prerequisitos necesarios para una instalación de una base de datos Oracle 19c, es muy aconsejable instalar el paquete oracle-database-preinstall-19c.
Este paquete de Linux instala automáticamente todos los requisitos necesarios de sofware (paquetes y dependencias), cambia y configura parámetros del sistema operativo, y crea usarios y grupos necesarios para poder instalar Oracle Dabase 19c / Oracle Grid infraestructure sin problemas.
En caso contrario, tendrás que cambiar/configurar todos los parámetros necesarios para la instalación de forma manual, con lo cual, la instalación de este paquete simplifica enormemente la instalación del software de Oracle.
Durante La instalación del software, indicamos un nombre de host y una ip fija.
Nuestra configuración es la siguiente.
Nombre del host: oracle19cdb1
ipfija del servidor: 192.168.1.137
Cómo nos encontramos con RHEL9, descargamos el RPM de la siguiente manera (con acceso a internet).
curl -o oracle-database-preinstall-19c-1.0-1.el9.x86_64.rpm https://yum.oracle.com/repo/OracleLinux/OL9/appstream/x86_64/getPackage/oracle-database-preinstall-19c-1.0-1.el9.x86_64.rpm
We install the recently downloaded package.
Antes de lanzar el instalador hay que tener en cuenta que el instalador de Oracle 19.3 no funciona correctamente en Linux 9. Si se lanza el instalador directamente tras bajar el software es muy probable que caigas en este Bug.
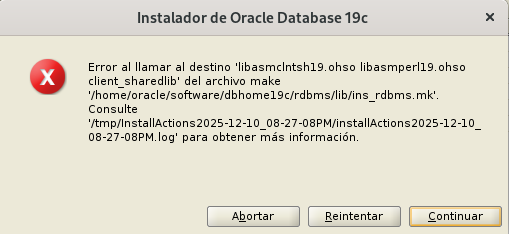
This is the error you will get if you try Install 19.3.
3- Preparing the environment before launching the installer.
First, before applying the patch, we update the Opatch file Opatch unzip p6880880_230000_LINUX.zip) as follows.
We navigate to the $ORACLE_HOME directory of our installation, move the Opatch directory Opatch another directory with a different name, and unzip the file p6880880_230000_LINUX.zip.
cd $ORACLE_HOME
pwd
/home/oracle/software/dbhome19c
[oracle@oracle19cdb1 dbhome19c]$ mv OPatch/ OPatch_old
oracle@oracle19cdb1 dbhome19c]$ unzip p6880880_230000_LINUX.zip
Archive:  p6880880_230000_LINUX.zip
   creating: OPatch/
   creating: OPatch/oracle_common/
   creating: OPatch/oracle_common/modules/
  inflating: OPatch/oracle_common/modules/com.oracle.glcm.common-logging_1.6.5.0.jar
  inflating: OPatch/oracle_common/modules/common-logging-config.jar
  inflating: OPatch/opatch_env.sh
Apply patch 35775632.
Para descargar el parche: Get Patch 35775632 (p35775632_190000_Linux-x86-64.zip) from My Oracle Support (MOS).

1 - Extraemos el parche descargado anteriormente.
unzip p35775632_190000_Linux-x86-64.zip


2 - Tras extraer el .zip, aparecerá un fichero "stubs.tar".
Localiza este fichero y copíalo a tú $ORACLE_HOME/lib/stubs

cp /home/oracle/software/35775632/stubs.tar $ORACLE_HOME/lib/stubs


3- Descomprime el fichero .tar que has copiado.
cd $ORACLE_HOME/lib/stubs
tar -xf stubs.tar
4. Instalación del software de base de datos 19c.
Before beginning the installation, we will create the directories where the installation will take place. We will also create an environment variables file so that we do not have to manually execute these variables each time we want to access our database.
mkdir -p /u01/app/oracle/product/19.0.0/dbhome_1
We decompress the LINUX.X64_193000_db_home.zip file.
pwd
/home/oracle/software/dbhome19c
[oracle@oracle19cdb1 dbhome19c]$ unzip LINUX.X64_193000_db_home.zip
Example of a file with environment variables test.env (adapt variables to the environment where it is being launched)
cat test.env

export TMP=/tmp
export TMPDIR=$TMP

export ORACLE_HOSTNAME=oracle19cdb1
export ORACLE_BASE=/u01/app/oracle
export ORACLE_HOME=/u01/app/oracle/product/19.0.0/dbhome_1
export ORA_INVENTORY=/u01/app/oraInventory
export ORACLE_SID=test
export PDB_NAME=testpdb1
export DATA_DIR=/oradata

export PATH=/usr/sbin:/usr/local/bin:$PATH
export PATH=$ORACLE_HOME/bin:$PATH

export LD_LIBRARY_PATH=$ORACLE_HOME/lib:/lib:/usr/lib
export CLASSPATH=$ORACLE_HOME/jlib:$ORACLE_HOME/rdbms/jlib
Once the patch has been applied, you can launch the installer.
We run the installer with ./runInstaller
oracle@oracle19cdb1 ~]$ . ./test.env
export CV_ASSUME_DISTID=OEL7.8

pwd
/home/oracle/software/dbhome19c
oracle@oracle19cdb1 dbhome19c]$ ./runInstaller
To prevent the following error from appearing.
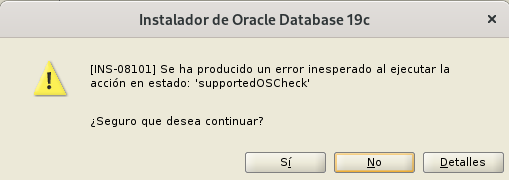
[INS-08101] Unexpected error while executing the action at state: 'supportedOSCheck'
Add the following environment variable (CV_ASSUME_DISTID=OEL7.8) before running the installer.
export CV_ASSUME_DISTID=OEL7.8

oracle@oracle19cdb1 dbhome19c]$ ./runInstaller
Running the installer.
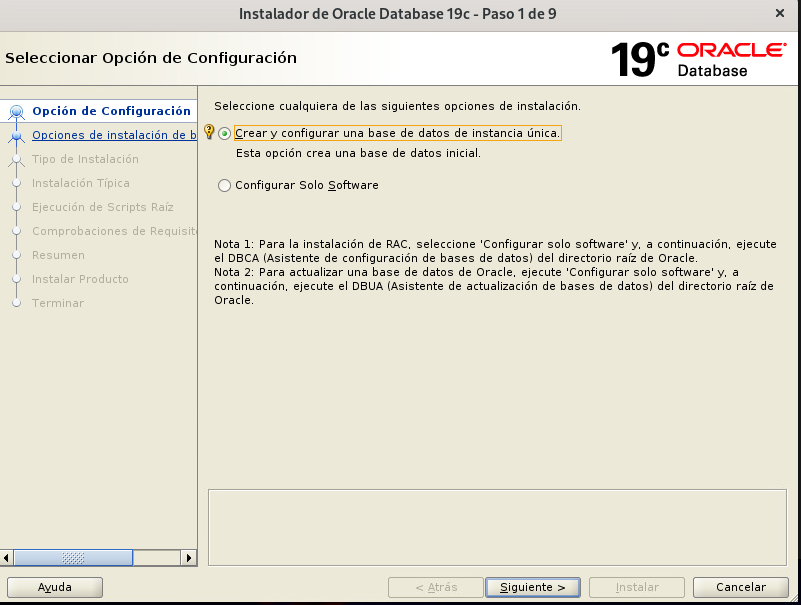
Aparecen dos opciones, instalar software y crear una base de datos o únicamente instalar sólo software.
Vamos a elegir la opción una, creando una base de datos de test.
Aparecen dos opciones.
La opción Escritorio es una instalación más simple, para bases de datos de desarrollo con configuración mínima para probar, aprender, etc. Con menos recuros más ideal para PCs, portátiles, etc. La sgunda opción (clase Servidor) es ideal para entornos productivos y servidores, donde se busca mayor escabilidad y rendimiento, los recursos por tanto son mayores.
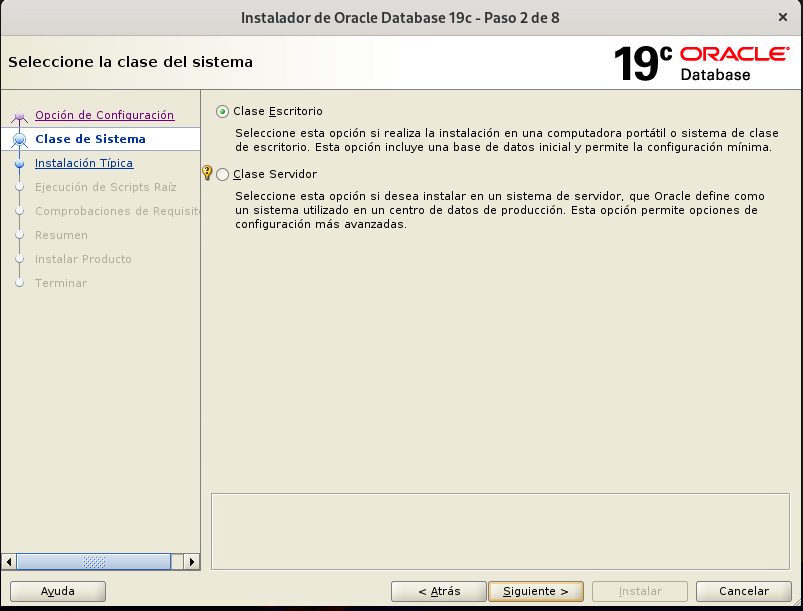
You can choose the option that best suits your needs. In our case, we will choose the second option, as it will be necessary for subsequent posts.
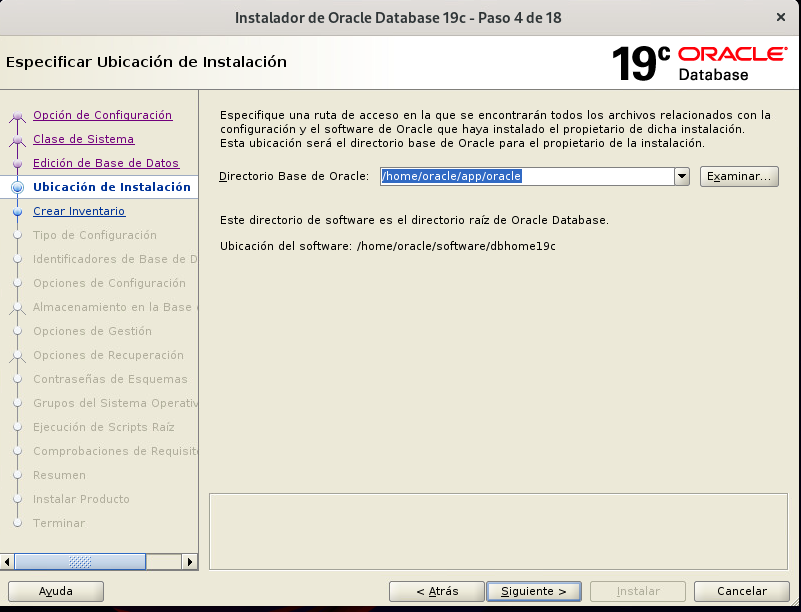
On this screen, we will choose the directory where the database software will be installed.
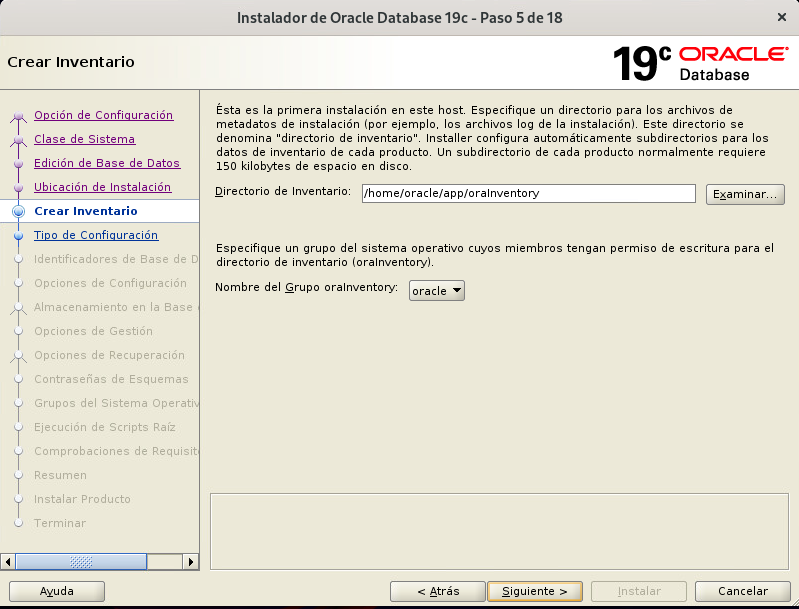
En esta pantalla indicaremos donde se encontrará el inventario de nuestro software.
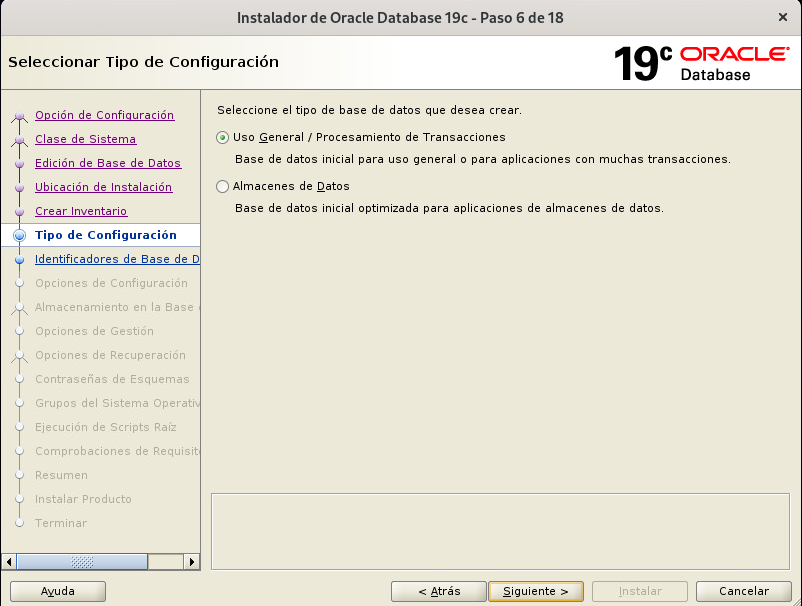
We choose the type of database we are going to create.
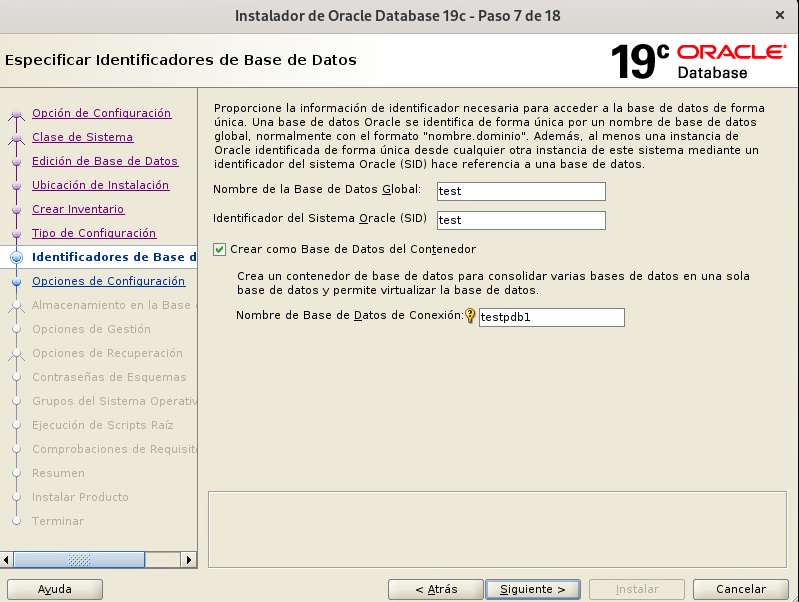
Especificamos los datos de nuestra base de datos, a la que llamaremos test. Esta base de datos será creada cómo arquitectura multitenant, por lo que elegiremos la opción «Crear como base de datos contenedor», y crearemos un nuevo contenedor, en nuestro caso «testpdb1».
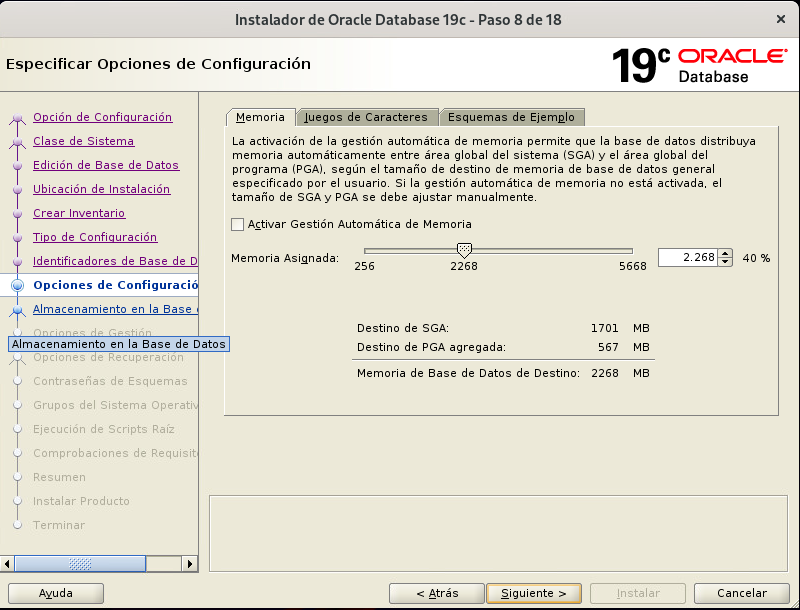
We specify the characteristics that our database will have.
Memory, character set, etc.
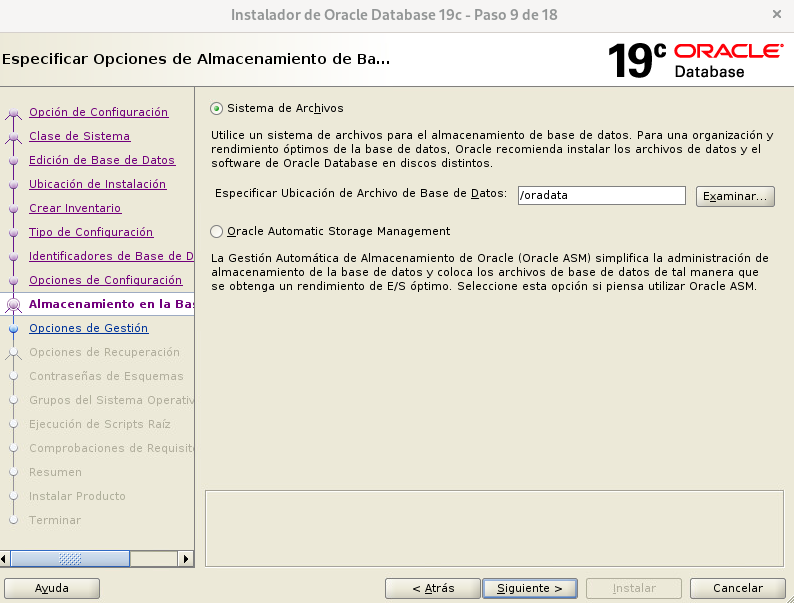
Elelgimos donde se almacenarán nuestros ficheros de base de datos. Son los ficheros físicos donde se almacenará nuestra base de datos.
En nuestro caso se almacenarán en un file system aparte del espacio donde se instalará el software de base de datos (recomendado).
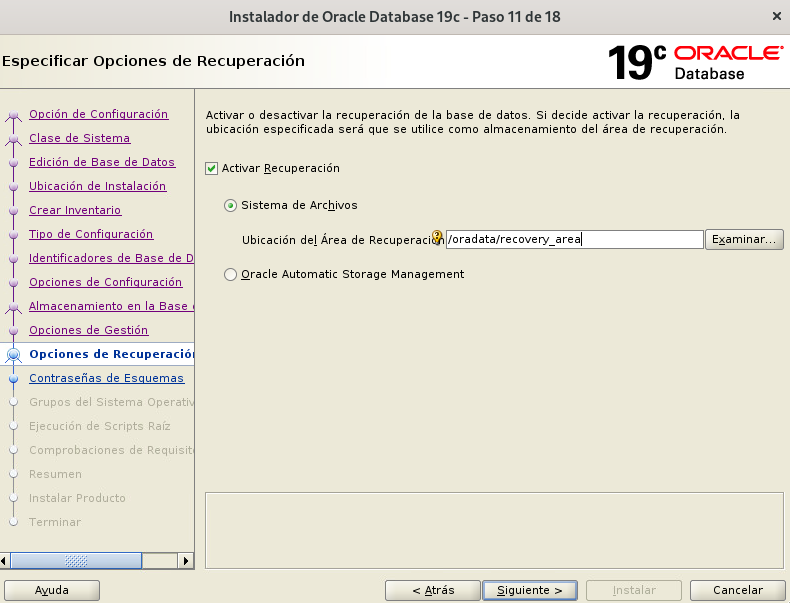
Enable or disable flash_recovery_area. Enable/disable this option, which allows you to automatically centralize and thus simplify and speed up backup and disaster recovery tasks.
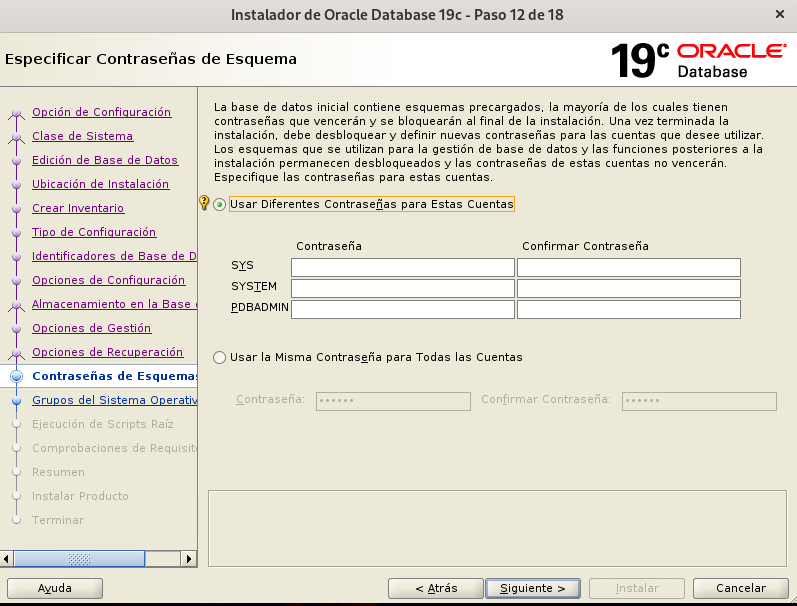
We start with the passwords for administrator users.
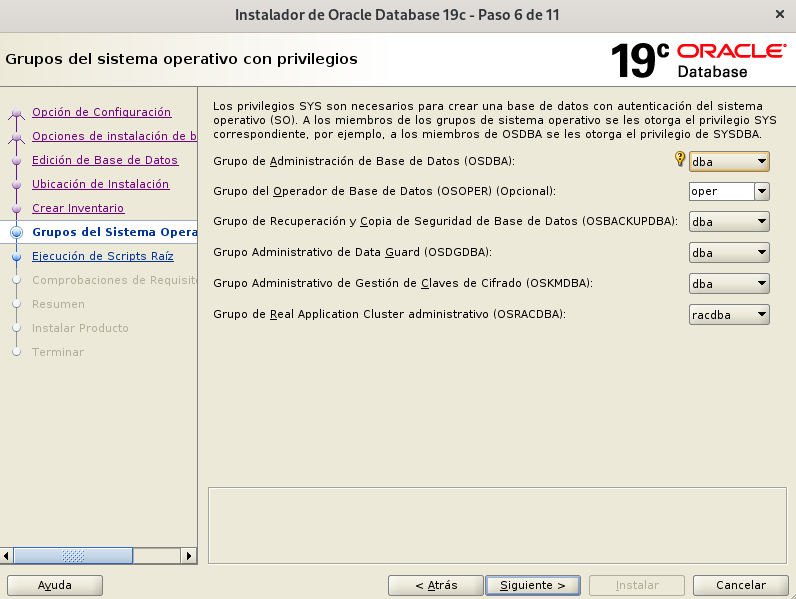
Specify operating system users and groups according to your system requirements (dba, oper, oinstall, etc.).
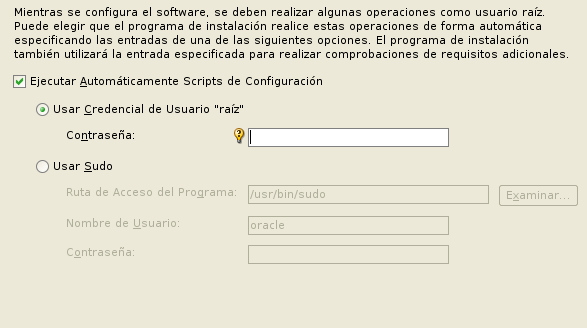
Script execution with root credentials.
For the installation to be successful, the installer must perform certain actions on our system with root user privileges. You can instruct the installer to run it automatically (credentials required) or run it manually once the installation is complete.
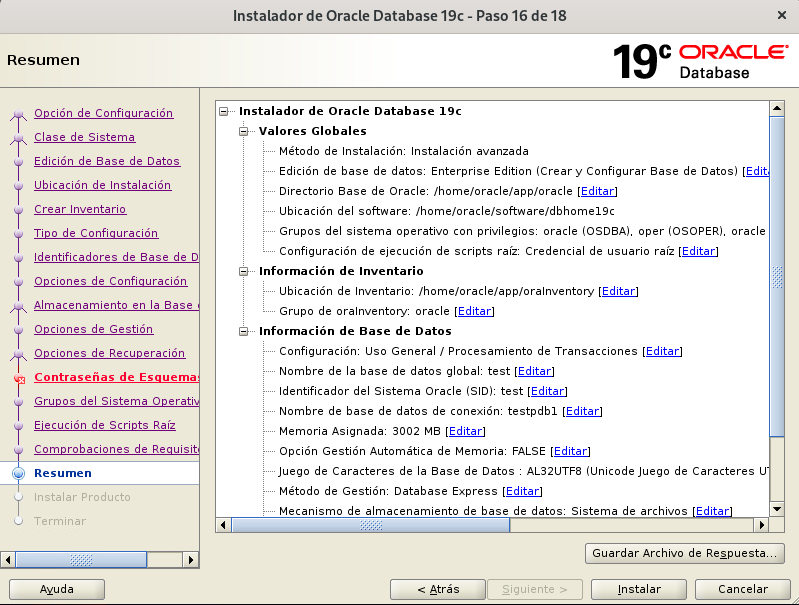
A summary of our installation will appear. We will check that everything is correct and begin the installation.
Finally, a message will appear indicating that the installation has been completed successfully.

5. Connect to the database.
La forma de conectarnos a nuestra pdb recien creada de forma directa mediate sqlplus es la siguiente.
sqlplus usuario/password@host:puerto/nombrepdb
oracle@oracle19cdb1 ~]$ sqlplus system/oracleconraul@oracle19cdb1:1521/testpdb1
SQL*Plus: Release 19.0.0.0.0 - Production on Tue Dec 16 01:48:56 2025
Version 19.3.0.0.0

Copyright (c) 1982, 2019, Oracle.  All rights reserved.


Connected to:
Oracle Database 19c Enterprise Edition Release 19.0.0.0.0 - Production
Version 19.3.0.0.0
The usual practice is not to connect directly to the database, but to create a tnsnames.ora file and connect to a development environment, most commonly SQL Developer.
Ejemplo fichero tnsnames.ora

[oracle@oracle19cdb1 ~]$ . oraenv
ORACLE_SID = [test] ? test
The Oracle base remains unchanged with value /home/oracle/software
[oracle@oracle19cdb1 ~]$ cd $TNS_ADMIN
[oracle@oracle19cdb1 admin]$ cat tnsnames.ora
testpdb1 =
  (DESCRIPTION =
    (ADDRESS = (PROTOCOL = TCP)(HOST = oracle19cdb1)(PORT = 1521))
    (CONNECT_DATA =
      (SERVER = DEDICATED)
      (SERVICE_NAME = testpdb1)
    )
  )
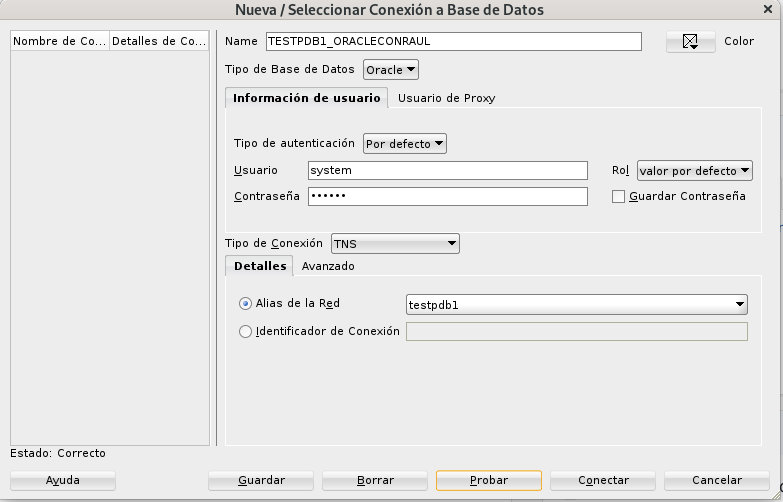
We choose a connection name, TNS connection type, and search for the alias name in our tnsnames.ora. We provide the username/password, and we are now ready to connect.